It is a popular artistic means for portrait photos, to highlight the portrait, by bringing the background out of focus. If you do not care for all the technical details, but simply want to know, how to achieve it, can jumpt directly to the Results in brief jump.
Content
1. First approaches to unsharp masking
2. Digression: SLR camera
3. Why doesn't a large focal length help to bring the background out of focus?
4. Is the depth of field independent of the focal length - in the same field of view?
5. Calculation of the blur
5.1. Focal length and aperture
5.2. Pictures to the sharpness
6. What can I still do , in order to get the background out of focus?
1. First approaches to unsharp masking
Of course, use the largest aperture (meaning. small aperture number) fotografieren. The digital Super Zoom camera offers aperture 2,8 -This sounds alright.
In addition, a skilled hobby photographer gave me the hint: to photograph with large focal length, because at large focal lengths, the depth of field is small, so that the background is out of focus.
Some trials with a super zoom digital camera (Bridge camera) unfortunately didn't bring the desired result.
2. Digression: SLR camera
Someone else says, the depth of field would be smaller for digital SLR cameras, and it is therefore correspondingly easier, to isolate the portrait from the background. Actually I think, that (digital) SLRs are relics from the past . Once upon a time they were useful, because SLRs show in the viewfinder the pitcure through the same lens as the picture is finally taken, unlike viewfinder cameras which use seperate optics for the viewfinder., ., .. In the digital age, the display shows what comes from the digital image sensor, and this is what will be shwon on the photograph.. The mirror reflex technique thus is simply superfluous, additionally big and heavy, especially since today's super zoom cameras have lenses, which eliminate the need for lens changing, because they range from 25 mm wide angle up 600 mm zoom (full-frame equivalent).
3. Why doesn't a large focal length help to bring the background out of focus?
Although the depth of field decreases with focal length (just the way, I was told), but it is increasing with increasing distance. If you would like to make a portrait image and use a long focal length, you must got further away, of course., Otherwise, the head or the face is not completely on the picture. At Wikipedia is written that, the depth of field is therefore "practically" independent of the focal length at same magnification ratio. So that's the reason, Although the tip with the larger focal length in principle was right, in fact but without success, because I had to go even further away and a larger distance increases the depth of field.
4. Is the depth of field independent of the focal length - in the same field of view?
The word "practical" and further restrictions in the Wikipedia article lead me to find, whether to achieve smaller depth of field but not in a specific focal length range. Google search brings me to a page, She will help me: http://elmar-baumann.de/fotografie/schaerfentiefe/node19.html. Elmar Baumann presents calculations and their results, showing, that is actually the depth of field with the focal length changes, also if you take the object always the same size. But it changes with focal at aperture 2,8 order only 3 Hundredths of millimetres when switching from 25 mm focal length to 1, 000 mm focal length. It is therefore actually "practically" constant.
5. Calculation of the blur
There is still a possibility with a super zoom camera to make the background out of focus? -I not give up yet, Finally, the depth of field on Baumann page specifies the scope, He seems really sharp, to the Unsharp mask but considerably more blur as merely a necessary is "not sharp". Perhaps the very fuzzy area responds Yes more to a change of in focal length?
To do this I found unfortunately no direct information on the Internet. I have to pay yourself. All necessary formulas can be found in the Wikipedia article on depth of field. I am to them, that I can enter:
- the magnification ratio
- the aperture
- the size of the sensor
- the focal length and
- the distance
The formula results in a measure of the sharpness in the requested removal (before and after the person), If the person to portraitierende depending on the focal length at a distance, so that it always the same size (same magnification ratio) appears in the photo (This is of course accepted, that is sharply set exactly to the person).
5.1. Focal length and aperture
Before I can present the result, to be dealt with yet a further complication: The maximum aperture is constant over the entire zoom range of the camera. It is larger in the wide angle (When the FZ100: 2,8) as in the zoom end, When the FZ100, for example, the maximum aperture is reduced to 5,2 When a kleinbild-equivalent focal length of 600 mm. From the information, It stores with the camera in the image files (EXIF data), can you see, How big is the aperture at different focal lengths. The Super Zoom camera FZ100 following connection will be:
The solid line emerges from a cubic regression equation to:
Using this formula, I can specify precisely defined, in which focal length the maximum aperture of FZ100 as large.
5.2. Pictures to the sharpness
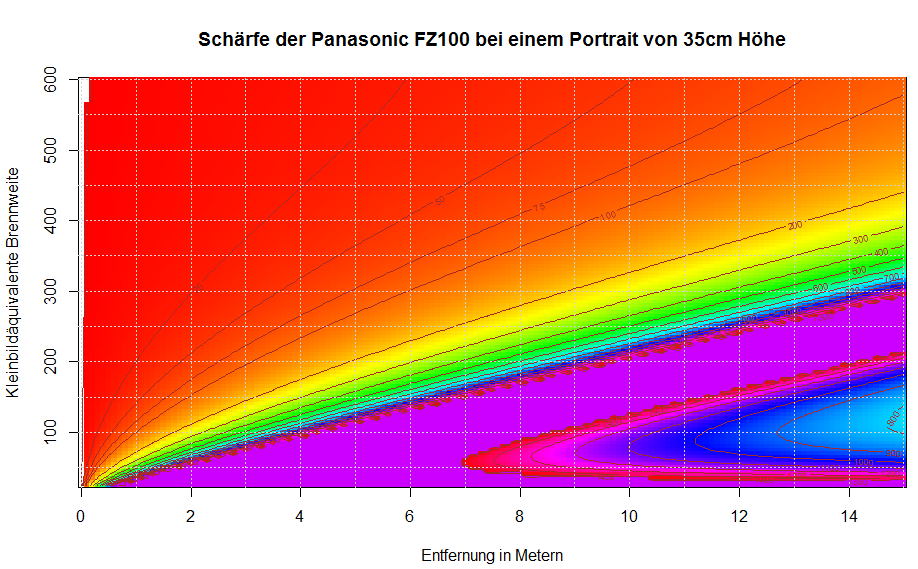
So that I can specify now for a magnification ratio and different focal lengths, How hot are objects before and after the person to portraitierenden. The following chart reflects the blur for portraits, the the whole head, including some cleavage (about. 35cm) map. The magnification ratio in the small screen format would be about 1:10.

Sharpness depending on distance and focal length at the DMC FZ100 at a kleinbildqäuivalenten magnification by 1:10
In this illustration is plotted according to right the distance of objects from the camera (check the box corresponding to 1 m) and to top the kleinbild-equivalent focal length (a box padded 50 mm). On the color you can see, How hot is an object.
Red stands for big blur, in yellow and green, it is slightly sharper, Light blue and blue still sharper and the purple area is sharp and very sharp. To the “Contour lines” can you read the numbers associated with the colors. The number of, on a Wievieltel of the diagonal spread a point held from reality. In the distance, where the point is mapped exactly hot, is the value infinitely large. If a point is so out of focus, spread its light over the whole image, the value is 1; spread the light half of the image (precise to half of the screen sizes), the value is 2. All the values 1500 were stained uniform purple, because of the sharp area interested in here not so much like the fuzzy.
As sharp are usually values 1.500 viewed, because at normal viewing distance (to match the screen sizes), can the human eye distinguish between no finer details (This is the maximum resolution of the eye of a half arcseconds). Values show vice versa see ca. 25-50 a such fuzzy figure, that she are very well suitable for the exemption.
In the figure, the dark red area is thus (Values less than 50) so out of focus, that it is suitable for the exemption. However, is when the FZ100 at a kleinbild equivalent magnification of 1:10 behind the focused area (Purple in the graphic) No red, meaning. behind the focused area, it is not as out of focus, that blur the exemption would be well suited. Conversely can before the sharp asked point quite well "be free". It is so easy, Objects to make very out of focus, located between the camera and the sharp asked object. That helps, unfortunately, not for a good portrait, with just the background (and not the foreground) should be out of focus.
6. What can I still do , in order to get the background out of focus?
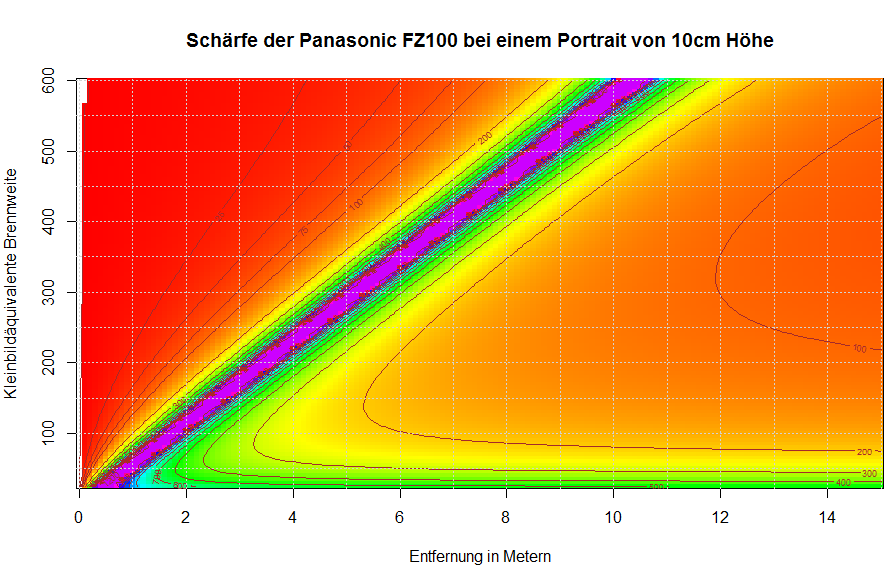
One way could be, an other image area to select, or more accurately, you restrict the portrait to mouth and eyes. These are ca in adults. 10-15cm, so that the magnification ratio is greater, say we ca. 1:3,33 (= 30%) for a 35 mm camera is. In this case, following sharpness graphic for the FZ100 arises:

Sharpness depending on distance and focal length at the DMC FZ100 at a kleinbildqäuivalenten magnification by 1:3,33
The sharp is actually much smaller; Unfortunately, the fuzzy area behind the sharp asked point at a kleinbild-equivalent focal length of 300 mm is only about 3 Meters behind orange to reddish - should therefore have this distance of the person to portraitierende from the background, so he is clearly out of focus.
Thus already quite good results can be achieved - but artistic freedom is limited: Only in mouth-eyes portraits it can succeed with a super zoom camera, the background to do so out of focus, that the face is clearly highlighted.
Can you create yet somehow also whole head Portriats with a super zoom camera, where the background is significantly out of focus?
It is rather well with the following trick: It makes multiple images - such as a panorama - and then puts them together. In this way to reach a small depth of field and can accommodate yet quite the head (However the model must keep course briefly reasonably quiet for this). It is the panorama mode suitable, Many digital cameras offer the. You can also the image behind on the computer, for example, with the image composite Editor, the Microsoft offering for free download, put together.
7. The results in brief
It is in fact with a digital compact- or bridge camera not directly possible, to mask the background when a whole head portrait neatly out of focus. Basically you should
1. Open the aperture as much as possible (small aperture number) -most cameras in portrait mode do that automatically
2. Choose a fairly long focal length, about. 200mm small-screen equivalent
3. The background should be as far as possible away from the model. The greater this distance, the background is more blurred. However makes the blur especially in the first 3 Meters behind the model to clearly, then, it is still blurred, from only slow.
4. Finally the most important thing: a possible fraction of the head on the photo ban. If the background should be really out of focus and the whole head, hire. to be included with cleavage, It is recommended, to assemble the portrait in the panorama mode from multiple shots. -That works well. If the camera can not even put together the images: The Microsoft image composite Editor (ICE) does that automatically and can downloaded free of charge be. Almost just as good works autostitcher, What is also free of charge. For other operating systems, there are open source software, p.E.. Hugin, but at least in the current version 2011.4 is slow and not as reliable.
If no hair sticks out or protruding hairs are not important, you can blur the background in an image editing software, for example, with GIMP, Select the face and blur everything else .


